3.2 Using HTTPS outcalls
In the past, blockchain networks were only able to communicate with external servers through blockchain oracles, or third-party entities that relayed calls from the blockchain to an external server, then routed the response back to the blockchain. This is because blockchains are a form of replicated state machine, where each replica must perform the same computations within the same state to make the same transitions each round. Since doing computations with results from an external source may lead to a state divergence, tools like oracles have been used in the past. However, on the Internet Computer, canisters can communicate directly with external servers or other blockchains through HTTPS outcalls.
HTTPS outcalls are a feature of canisters on ICP that allow smart contracts to directly make calls to HTTP servers that are external to ICP. The response of these HTTP calls can then be used by the smart contract in a way that the replica can safely be updated using the response without the risk of a state divergence.
This guide uses the term HTTPS to refer to both the HTTP and HTTPS protocols. This is because typically all traffic on a public network uses the secure HTTPS protocol.
HTTPS outcalls provide the ability for different use cases and have several advantages compared to using oracles to handle external requests. Some of these are HTTPS outcalls use a stronger trust model since there are no external intermediaries, such as an oracle, required for the canister to communicate with external servers, and using HTTPS outcalls for communicating with external servers makes using canisters feel much closer to a "traditional" programming workflow that may not use blockchains or oracles. Most real-world dapps have a need for accessing data stored in off-chain entities, since most digital data is still stored in traditional, 'Web 2', services.
Supported HTTP methods
Currently, HTTPS outcalls support GET, HEAD, and POST methods for HTTP requests. In this guide, you'll look at examples for GET and POST methods.
Cycles
Cycles used to pay for an HTTP call must be explicitly transferred with the call. They will not be automatically deducted from the caller's balance.
HTTPS outcalls API
A canister can make an HTTPS outcall by using the http_request method. This method uses the following parameters:
url: Specifies the requested URL; must be valid per the standard RFC-3986. The length must not exceed8192and may include a custom port number.max_response_bytes: Specifies the maximum size of the request in bytes and must not exceed 2MB. This field is optional; if this field is not specified, the maximum of 2MB will be used.
It is recommended to set max_response_bytes, since using it appropriately can save developers a significant amount of cycles.
method: Specifies the method; currently, onlyGET,HEAD, andPOSTare supported.headers: Specifies the list of HTTP request headers and their corresponding values.body: Specifies the content of the request's body. This field is optional.transform: Specifies a function that transforms raw responses to sanitized responses, and a byte-encoded context that is provided to the function upon invocation, along with the response to be sanitized. This field is optional; if it is provided, the calling canister itself must export this function.
The returned response, including the response to the transform function if specified, will contain the following content:
status: Specifies the response status (e.g., 200, 404).headers: Specifies the list of HTTP response headers and their corresponding values.body: Specifies the response's body.
IPv6
When deploying applications to the Internet Computers, HTTPS outcalls can only be made to APIs that support IPv6. You can check if an API supports IPv6 by using a tool such as https://ready.chair6.net/.
HTTP GET
To demonstrate how to use the HTTP GET outcall, you'll create a simple canister that has one public method named get_icp_usd_exchange(). This method will trigger an HTTP GET request to the external service Coinbase, which will return current data on the exchange rate between USD and ICP. This canister will have no frontend, and you will interact with its public methods via the Candid web UI.
Prerequisites
Before you start, verify that you have set up your developer environment according to the instructions in 0.3: Developer environment setup.
Creating a new project
To get started, create a new project in your working directory. Open a terminal window, navigate into your working directory (developer_ladder), then use the following commands to start dfx and create a new project:
dfx start --clean --background
dfx new https_get
You will be prompted to select the language that your backend canister will use. Select 'Motoko':
? Select a backend language: ›
❯ Motoko
  Rust
  TypeScript (Azle)
  Python (Kybra)
dfx versions v0.17.0 and newer support this dfx new interactive prompt. Learn more about dfx v0.17.0.
Then, select a frontend framework for your frontend canister. Select 'None':
  ? Select a frontend framework: ›
  SvelteKit
  React
  Vue
  Vanilla JS
  No JS template
❯ None
Lastly, you can include extra features to be added to your project:
  ? Add extra features (space to select, enter to confirm) ›
⬚ Internet Identity
⬚ Bitcoin (Regtest)
⬚ Frontend tests
Then, navigate into the new project directory:
cd https_get
Creating an HTTP GET request
Then, open the src/https_get_backend/main.mo file in your code editor and replace the existing content with:
import Blob "mo:base/Blob";
import Cycles "mo:base/ExperimentalCycles";
import Nat64 "mo:base/Nat64";
import Text "mo:base/Text";
import IC "ic:aaaaa-aa";
This piece of code imports the libraries that you'll be using. Each of these libraries is part of the Motoko base package, as indicated by 'mo:base'.
Now let's insert the code to define our actor. This actor will contain two functions; a function to transform the response that you'll receive from our GET response, and a function that sends our GET request. The code has been annotated with notes describing in detail what each piece does:
actor {

  //This method sends a GET request to a URL with a free API we can test.
  //This method returns Coinbase data on the exchange rate between USD and ICP
  //for a certain day.
  //The API response looks like this:
  //  [
  //     [
  //         1682978460, <-- start timestamp
  //         5.714, <-- lowest price during time range
  //         5.718, <-- highest price during range
  //         5.714, <-- price at open
  //         5.714, <-- price at close
  //         243.5678 <-- volume of ICP traded
  //     ],
  // ]

  //function to transform the response
  public query func transform({
    context : Blob;
    response : IC.http_request_result;
  }) : async IC.http_request_result {
    {
      response with headers = []; // not intersted in the headers
    };
  };

  public func get_icp_usd_exchange() : async Text {

    //1. SETUP ARGUMENTS FOR HTTP GET request
    let ONE_MINUTE : Nat64 = 60;
    let start_timestamp : Nat64 = 1682978460; //May 1, 2023 22:01:00 GMT
    let host : Text = "api.exchange.coinbase.com";
    let url = "https://" # host # "/products/ICP-USD/candles?start=" # Nat64.toText(start_timestamp) # "&end=" # Nat64.toText(start_timestamp) # "&granularity=" # Nat64.toText(ONE_MINUTE);

    // 1.2 prepare headers for the system http_request call
    let request_headers = [
      { name = "User-Agent"; value = "price-feed" },
    ];

    // 1.3 The HTTP request
    let http_request : IC.http_request_args = {
      url = url;
      max_response_bytes = null; //optional for request
      headers = request_headers;
      body = null; //optional for request
      method = #get;
      transform = ?{
        function = transform;
        context = Blob.fromArray([]);
      };
    };

    //2. ADD CYCLES TO PAY FOR HTTP REQUEST

    //IC management canister will make the HTTP request so it needs cycles
    //See: https://internetcomputer.org/docs/current/motoko/main/cycles

    //The way Cycles.add() works is that it adds those cycles to the next asynchronous call
    //See:
    // - https://internetcomputer.org/docs/current/references/ic-interface-spec/#ic-http_request
    // - https://internetcomputer.org/docs/current/references/https-outcalls-how-it-works#pricing
    // - https://internetcomputer.org/docs/current/developer-docs/gas-cost
    Cycles.add<system>(230_949_972_000);

    //3. MAKE HTTPS REQUEST AND WAIT FOR RESPONSE
    let http_response : IC.http_request_result = await IC.http_request(http_request);

    //4. DECODE THE RESPONSE

    //As per the type declarations, the BODY in the HTTP response
    //comes back as Blob. Type signature:

    //public type http_request_result = {
    //     status : Nat;
    //     headers : [HttpHeader];
    //     body : Blob;
    // };

    //We need to decode that Blob that is the body into readable text.
    //To do this, we:
    //  1. Use Text.decodeUtf8() method to convert the Blob to a ?Text optional
    //  2. We use a switch to explicitly call out both cases of decoding the Blob into ?Text
    let decoded_text : Text = switch (Text.decodeUtf8(http_response.body)) {
      case (null) { "No value returned" };
      case (?y) { y };
    };

    //5. RETURN RESPONSE OF THE BODY
    //The API response will looks like this:
    //
    // ("[[1682978460,5.714,5.718,5.714,5.714,243.5678]]")
    //
    //The API response looks like this:
    //  [
    //     [
    //         1682978460, <-- start timestamp
    //         5.714, <-- lowest price during time range
    //         5.718, <-- highest price during range
    //         5.714, <-- price at open
    //         5.714, <-- price at close
    //         243.5678 <-- volume of ICP traded
    //     ],
    // ]
    decoded_text;
  };

};
The code above is annotated with detailed notes and explanations. Take a moment to read through the code's content and annotations to fully understand the code's functionality.
A few important points to note are:
get_icp_usd_exchange()is an update call. All methods that make HTTPS outcalls must be update calls because they go through consensus, even if the HTTPS outcall is aGET.The code above adds
230_949_972_000cycles. This is typically enough forGETrequests, but this may need to change depending on your use case.
The transform function
The transform function in the code above is important because it takes the raw content and transforms it into a raw HTTP payload. This step sets the payload's headers, which include the Content Security Policy and Strict Transport Security headers.
When developing locally, this function doesn't have much of an effect since only the local replica (one node) is making the call.
When HTTP calls are used on the mainnet, a common error message may appear that indicates not all replicas on the subnet get the same response:
Reject text: Canister http responses were different across replicas, and no consensus was reached
This error occurs when the replicas on the subnet don't all return the same value for a piece of data within the HTTP response. For example, if you have an application that sends an HTTP request to the Coinbase API for the current price of a token, due to latency the replicas will not all return the same response. To remedy this, you can request the token price for a specific timestamp to assure that the replicas all return the same response.
Once you've inserted these snippets of code into the src/https_get_backend/main.mo file, save the file. The file should look like this:
import Blob "mo:base/Blob";
import Cycles "mo:base/ExperimentalCycles";
import Nat64 "mo:base/Nat64";
import Text "mo:base/Text";
import IC "ic:aaaaa-aa";

//Actor
actor {

  //This method sends a GET request to a URL with a free API we can test.
  //This method returns Coinbase data on the exchange rate between USD and ICP
  //for a certain day.
  //The API response looks like this:
  //  [
  //     [
  //         1682978460, <-- start timestamp
  //         5.714, <-- lowest price during time range
  //         5.718, <-- highest price during range
  //         5.714, <-- price at open
  //         5.714, <-- price at close
  //         243.5678 <-- volume of ICP traded
  //     ],
  // ]

  //function to transform the response
  public query func transform({
    context : Blob;
    response : IC.http_request_result;
  }) : async IC.http_request_result {
    {
      response with headers = []; // not intersted in the headers
    };
  };

  public func get_icp_usd_exchange() : async Text {

    //1. SETUP ARGUMENTS FOR HTTP GET request
    let ONE_MINUTE : Nat64 = 60;
    let start_timestamp : Nat64 = 1682978460; //May 1, 2023 22:01:00 GMT
    let host : Text = "api.exchange.coinbase.com";
    let url = "https://" # host # "/products/ICP-USD/candles?start=" # Nat64.toText(start_timestamp) # "&end=" # Nat64.toText(start_timestamp) # "&granularity=" # Nat64.toText(ONE_MINUTE);

    // 1.2 prepare headers for the system http_request call
    let request_headers = [
      { name = "User-Agent"; value = "price-feed" },
    ];

    // 1.3 The HTTP request
    let http_request : IC.http_request_args = {
      url = url;
      max_response_bytes = null; //optional for request
      headers = request_headers;
      body = null; //optional for request
      method = #get;
      transform = ?{
        function = transform;
        context = Blob.fromArray([]);
      };
    };

    //2. ADD CYCLES TO PAY FOR HTTP REQUEST

    //IC management canister will make the HTTP request so it needs cycles
    //See: https://internetcomputer.org/docs/current/motoko/main/cycles

    //The way Cycles.add() works is that it adds those cycles to the next asynchronous call
    //See:
    // - https://internetcomputer.org/docs/current/references/ic-interface-spec/#ic-http_request
    // - https://internetcomputer.org/docs/current/references/https-outcalls-how-it-works#pricing
    // - https://internetcomputer.org/docs/current/developer-docs/gas-cost
    Cycles.add<system>(230_949_972_000);

    //3. MAKE HTTPS REQUEST AND WAIT FOR RESPONSE
    let http_response : IC.http_request_result = await IC.http_request(http_request);

    //4. DECODE THE RESPONSE

    //As per the type declarations, the BODY in the HTTP response
    //comes back as Blob. Type signature:

    //public type http_request_result = {
    //     status : Nat;
    //     headers : [HttpHeader];
    //     body : Blob;
    // };

    //We need to decode that Blob that is the body into readable text.
    //To do this, we:
    //  1. Use Text.decodeUtf8() method to convert the Blob to a ?Text optional
    //  2. We use a switch to explicitly call out both cases of decoding the Blob into ?Text
    let decoded_text : Text = switch (Text.decodeUtf8(http_response.body)) {
      case (null) { "No value returned" };
      case (?y) { y };
    };

    //5. RETURN RESPONSE OF THE BODY
    //The API response will looks like this:
    //
    // ("[[1682978460,5.714,5.718,5.714,5.714,243.5678]]")
    //
    //The API response looks like this:
    //  [
    //     [
    //         1682978460, <-- start timestamp
    //         5.714, <-- lowest price during time range
    //         5.718, <-- highest price during range
    //         5.714, <-- price at open
    //         5.714, <-- price at close
    //         243.5678 <-- volume of ICP traded
    //     ],
    // ]
    decoded_text;
  };

};
Now, you can deploy the canister locally with the commands:
dfx start --clean --background
dfx deploy
Recall that if you'd like to deploy this canister on the mainnet, you can use the --network ic flag.
These commands should return the canister's URL. Open the http_get_backend canister's URL to open the Candid UI:
  Backend canister via Candid interface:
    http_get_backend: http://127.0.0.1:4943/?canisterId=a3shf-5eaaa-aaaaa-qaafa-cai&id=avqkn-guaaa-aaaaa-qaaea-cai
Calling the HTTP GET request
Once you open the Candid UI, you can use the 'Call' button to call the get_icp_usd_exchange() method, which sends an HTTP GET request. The result will be returned in the UI, such as:
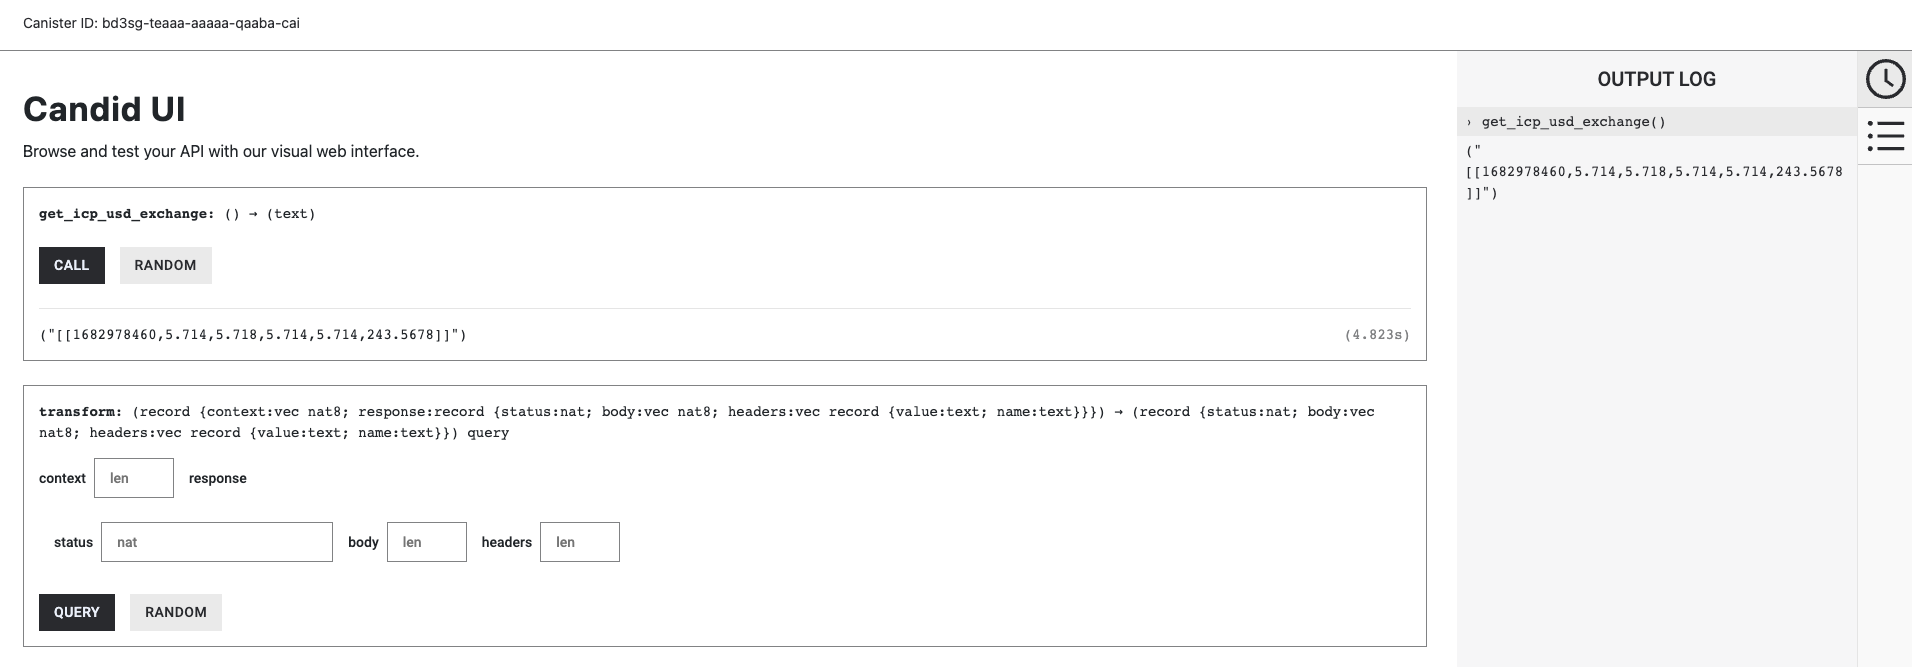
You can play with a version of this canister running onchain: https://a4gq6-oaaaa-aaaab-qaa4q-cai.raw.ic0.app/?id=fm664-jyaaa-aaaap-qbomq-cai
HTTP POST
To demonstrate how to use the HTTP POST outcall, you'll create a simple canister that has one public method named send_http_post_request(). This method will trigger an HTTP POST request to a public API service where the HTTP request can be inspected and you can inspect the request's headers and body to validate that it reflects what the canister sent.
The following are some important notes on POST requests:
Since HTTPS outcalls go through consensus, it is expected that any HTTP
POSTrequest may be sent several times to its destination. This is because it is common for clients to retry requests for a variety of reasons.It is recommended that HTTP
POSTrequests add the idempotency keys in the header of the request so that the destination knows whichPOSTrequests from the client are identical.Developers should be cautious using idempotency keys since the destination server may not know how to understand and use them.
Creating a new project
For simplicity, you'll create a new project for our HTTP POST request. Navigate into your working directory and create another new project:
dfx new https_post
cd https_post
Creating an HTTP POST request
Then, open the src/https_post_backend/main.mo file in your code editor and replace the existing content with:
import Blob "mo:base/Blob";
import Cycles "mo:base/ExperimentalCycles";
import Nat64 "mo:base/Nat64";
import Text "mo:base/Text";
Now, you'll define an actor using that contain two functions; a function to transform the response that you'll receive from our POST response, and a function that sends our POST request. The code has been annotated with notes describing in detail what each piece does:
//Actor
actor {

  //This method sends a GET request to a URL with a free API we can test.
  //This method returns Coinbase data on the exchange rate between USD and ICP
  //for a certain day.
  //The API response looks like this:
  //  [
  //     [
  //         1682978460, <-- start timestamp
  //         5.714, <-- lowest price during time range
  //         5.718, <-- highest price during range
  //         5.714, <-- price at open
  //         5.714, <-- price at close
  //         243.5678 <-- volume of ICP traded
  //     ],
  // ]

  //function to transform the response
  public query func transform({
    context : Blob;
    response : IC.http_request_result;
  }) : async IC.http_request_result {
    {
      response with headers = []; // not intersted in the headers
    };
  };

  public func get_icp_usd_exchange() : async Text {

    //1. SETUP ARGUMENTS FOR HTTP GET request
    let ONE_MINUTE : Nat64 = 60;
    let start_timestamp : Nat64 = 1682978460; //May 1, 2023 22:01:00 GMT
    let host : Text = "api.exchange.coinbase.com";
    let url = "https://" # host # "/products/ICP-USD/candles?start=" # Nat64.toText(start_timestamp) # "&end=" # Nat64.toText(start_timestamp) # "&granularity=" # Nat64.toText(ONE_MINUTE);

    // 1.2 prepare headers for the system http_request call
    let request_headers = [
      { name = "User-Agent"; value = "price-feed" },
    ];

    // 1.3 The HTTP request
    let http_request : IC.http_request_args = {
      url = url;
      max_response_bytes = null; //optional for request
      headers = request_headers;
      body = null; //optional for request
      method = #get;
      transform = ?{
        function = transform;
        context = Blob.fromArray([]);
      };
    };

    //2. ADD CYCLES TO PAY FOR HTTP REQUEST

    //IC management canister will make the HTTP request so it needs cycles
    //See: https://internetcomputer.org/docs/current/motoko/main/cycles

    //The way Cycles.add() works is that it adds those cycles to the next asynchronous call
    //See:
    // - https://internetcomputer.org/docs/current/references/ic-interface-spec/#ic-http_request
    // - https://internetcomputer.org/docs/current/references/https-outcalls-how-it-works#pricing
    // - https://internetcomputer.org/docs/current/developer-docs/gas-cost
    Cycles.add<system>(230_949_972_000);

    //3. MAKE HTTPS REQUEST AND WAIT FOR RESPONSE
    let http_response : IC.http_request_result = await IC.http_request(http_request);

    //4. DECODE THE RESPONSE

    //As per the type declarations, the BODY in the HTTP response
    //comes back as Blob. Type signature:

    //public type http_request_result = {
    //     status : Nat;
    //     headers : [HttpHeader];
    //     body : Blob;
    // };

    //We need to decode that Blob that is the body into readable text.
    //To do this, we:
    //  1. Use Text.decodeUtf8() method to convert the Blob to a ?Text optional
    //  2. We use a switch to explicitly call out both cases of decoding the Blob into ?Text
    let decoded_text : Text = switch (Text.decodeUtf8(http_response.body)) {
      case (null) { "No value returned" };
      case (?y) { y };
    };

    //5. RETURN RESPONSE OF THE BODY
    //The API response will looks like this:
    //
    // ("[[1682978460,5.714,5.718,5.714,5.714,243.5678]]")
    //
    //The API response looks like this:
    //  [
    //     [
    //         1682978460, <-- start timestamp
    //         5.714, <-- lowest price during time range
    //         5.718, <-- highest price during range
The transform function in this HTTP POST request should be used in the same manner that it was in the HTTP GET example. You can revisit the transform function description above for more information.
The code above is annotated with detailed notes and explanations. Take a moment to read through the code's content and annotations to fully understand the code's functionality.
Once you've inserted these snippets of code into the src/https_post_backend/main.mo file, save the file. The file should look like this:
import Blob "mo:base/Blob";
import Cycles "mo:base/ExperimentalCycles";
import Nat64 "mo:base/Nat64";
import Text "mo:base/Text";
import IC "ic:aaaaa-aa";

//Actor
actor {

  //This method sends a GET request to a URL with a free API we can test.
  //This method returns Coinbase data on the exchange rate between USD and ICP
  //for a certain day.
  //The API response looks like this:
  //  [
  //     [
  //         1682978460, <-- start timestamp
  //         5.714, <-- lowest price during time range
  //         5.718, <-- highest price during range
  //         5.714, <-- price at open
  //         5.714, <-- price at close
  //         243.5678 <-- volume of ICP traded
  //     ],
  // ]

  //function to transform the response
  public query func transform({
    context : Blob;
    response : IC.http_request_result;
  }) : async IC.http_request_result {
    {
      response with headers = []; // not intersted in the headers
    };
  };

  public func get_icp_usd_exchange() : async Text {

    //1. SETUP ARGUMENTS FOR HTTP GET request
    let ONE_MINUTE : Nat64 = 60;
    let start_timestamp : Nat64 = 1682978460; //May 1, 2023 22:01:00 GMT
    let host : Text = "api.exchange.coinbase.com";
    let url = "https://" # host # "/products/ICP-USD/candles?start=" # Nat64.toText(start_timestamp) # "&end=" # Nat64.toText(start_timestamp) # "&granularity=" # Nat64.toText(ONE_MINUTE);

    // 1.2 prepare headers for the system http_request call
    let request_headers = [
      { name = "User-Agent"; value = "price-feed" },
    ];

    // 1.3 The HTTP request
    let http_request : IC.http_request_args = {
      url = url;
      max_response_bytes = null; //optional for request
      headers = request_headers;
      body = null; //optional for request
      method = #get;
      transform = ?{
        function = transform;
        context = Blob.fromArray([]);
      };
    };

    //2. ADD CYCLES TO PAY FOR HTTP REQUEST

    //IC management canister will make the HTTP request so it needs cycles
    //See: https://internetcomputer.org/docs/current/motoko/main/cycles

    //The way Cycles.add() works is that it adds those cycles to the next asynchronous call
    //See:
    // - https://internetcomputer.org/docs/current/references/ic-interface-spec/#ic-http_request
    // - https://internetcomputer.org/docs/current/references/https-outcalls-how-it-works#pricing
    // - https://internetcomputer.org/docs/current/developer-docs/gas-cost
    Cycles.add<system>(230_949_972_000);

    //3. MAKE HTTPS REQUEST AND WAIT FOR RESPONSE
    let http_response : IC.http_request_result = await IC.http_request(http_request);

    //4. DECODE THE RESPONSE

    //As per the type declarations, the BODY in the HTTP response
    //comes back as Blob. Type signature:

    //public type http_request_result = {
    //     status : Nat;
    //     headers : [HttpHeader];
    //     body : Blob;
    // };

    //We need to decode that Blob that is the body into readable text.
    //To do this, we:
    //  1. Use Text.decodeUtf8() method to convert the Blob to a ?Text optional
    //  2. We use a switch to explicitly call out both cases of decoding the Blob into ?Text
    let decoded_text : Text = switch (Text.decodeUtf8(http_response.body)) {
      case (null) { "No value returned" };
      case (?y) { y };
    };

    //5. RETURN RESPONSE OF THE BODY
    //The API response will looks like this:
    //
    // ("[[1682978460,5.714,5.718,5.714,5.714,243.5678]]")
    //
    //The API response looks like this:
    //  [
    //     [
    //         1682978460, <-- start timestamp
    //         5.714, <-- lowest price during time range
    //         5.718, <-- highest price during range
    //         5.714, <-- price at open
    //         5.714, <-- price at close
    //         243.5678 <-- volume of ICP traded
    //     ],
    // ]
    decoded_text;
  };

};
Now, you can deploy the canister locally with the commands:
dfx start --clean --background
dfx deploy
Recall that if you'd like to deploy this canister on the mainnet, you can use the --network ic flag.
These commands should return the canister's URL. Open the http_get_backend canister's URL to open the Candid UI:
  Backend canister via Candid interface:
    http_post_backend: http://127.0.0.1:4943/?canisterId=a3shf-5eaaa-aaaaa-qaafa-cai&id=avqkn-aaaaa-guaaa-qaaea-cai
Calling the HTTP POST request
Once you open the Candid UI, you can use the 'Call' button to call the send_http_post_request() method, which sends an HTTP POST request. The result will be returned in the UI, such as:
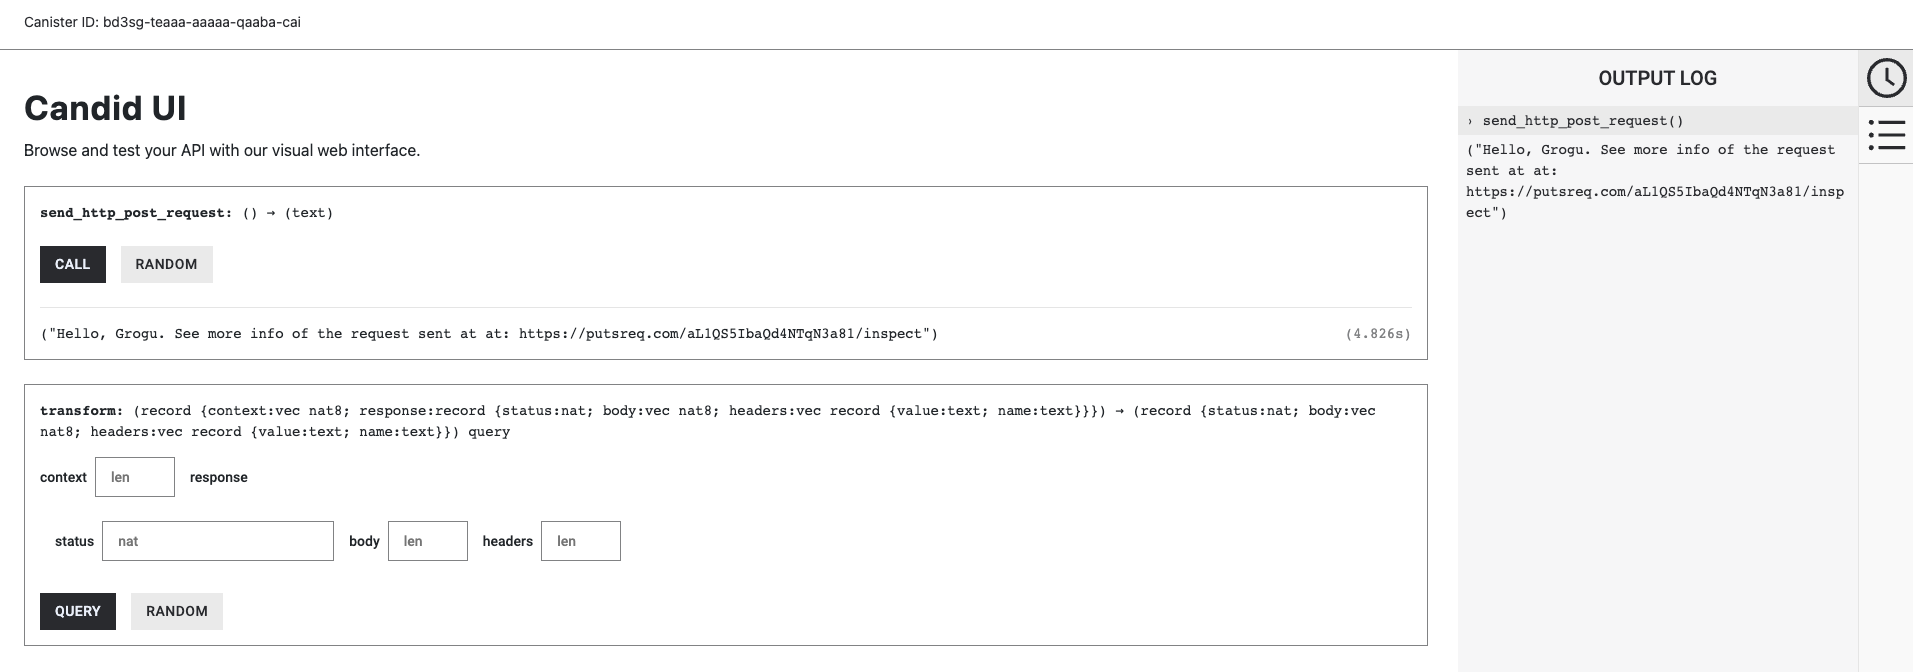
You can play with a version of this canister running onchain: https://a4gq6-oaaaa-aaaab-qaa4q-cai.raw.ic0.app/?id=fc4tu-siaaa-aaaap-qbonq-cai.
Need help?
Did you get stuck somewhere in this tutorial, or feel like you need additional help understanding some of the concepts? The ICP community has several resources available for developers, like working groups and bootcamps, along with our Discord community, forum, and events such as hackathons. Here are a few to check out:
Developer Discord, which is a large chatroom for ICP developers to ask questions, get help, or chat with other developers asynchronously via text chat.
Motoko Bootcamp - The DAO Adventure - Discover the Motoko language in this 7 day adventure and learn to build a DAO on the Internet Computer.
Motoko Bootcamp - Discord community - A community for and by Motoko developers to ask for advice, showcase projects and participate in collaborative events.
Weekly developer office hours to ask questions, get clarification, and chat with other developers live via voice chat. This is hosted on the Discord server.
Submit your feedback to the ICP Developer feedback board.
Next steps
Next, let's dive deeper into certified variables: